MicroFrontends with Vue

Microservices are a well known concept nowadays. Handling encapsulated logic in different applications, can be a nice fit for bigger teams to avoid problems in deployments and development speed. Most of the time though, people are talking about the backend, where the UI part to some extend stays as a black box. One of the solutions to also further break down the UI is the concept of microfrontends which we will further explore here.

There are obviously also other ways to solve issues (I can highly recommend reading Sam Newmans awesome book on this https://samnewman.io/books/building_microservices_2nd_edition/ ), but one way to decompose your UI might be as following.

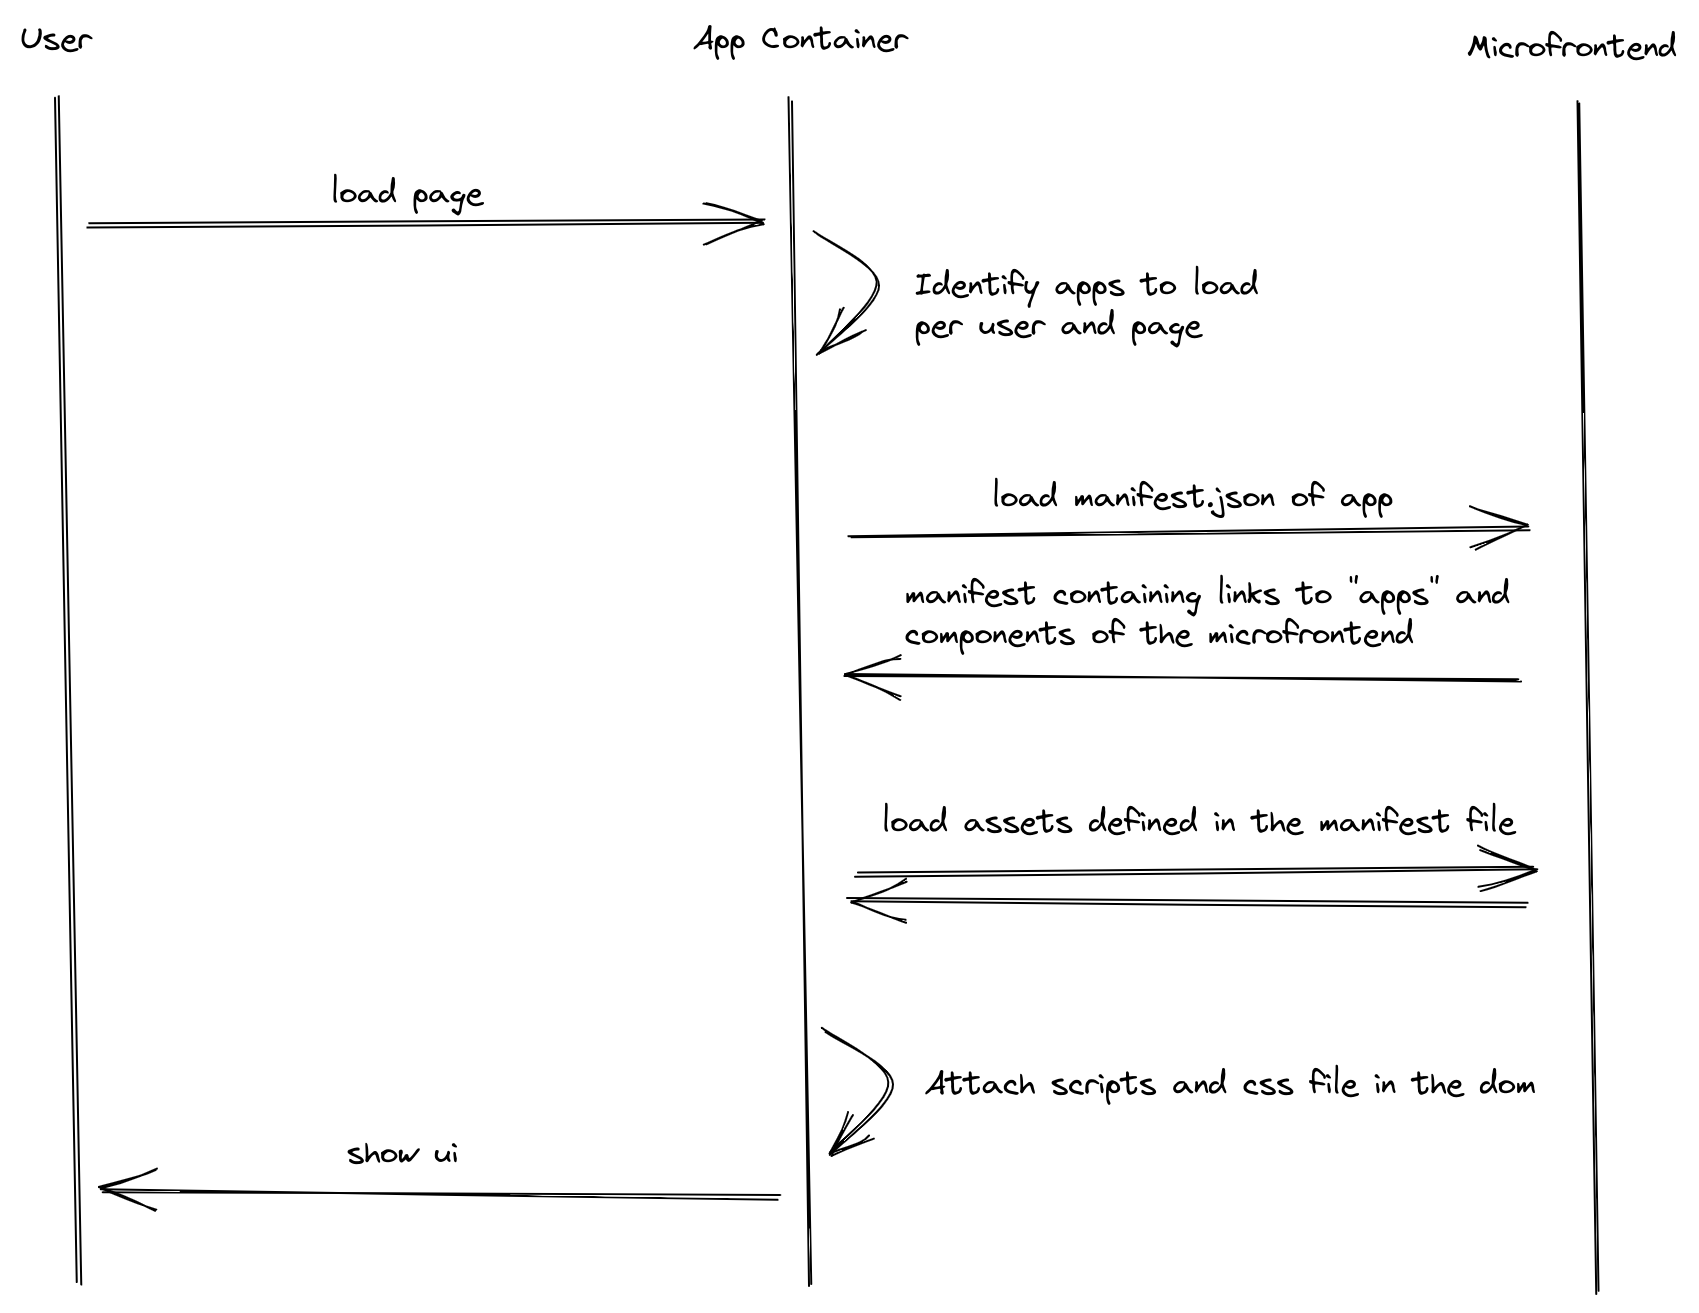
Each service not only contains the backend logic which then gets called the from one service to render the UI, but rather each service comes with its own UI which then gets loaded into an application which keeps an overview of all the systems to load. This allows us to deploy the full service UI and backend on its own without the need to deploy one big system for each change. This avoids keeping two systems too much in sync in terms of deployments.

Basic structure

In order to do this I used a vue js setup, where we have one container app, which further loads asynchronously applications into the main container (this is heavily inspired by https://blog.bitsrc.io/how-to-develop-microfrontends-using-react-step-by-step-guide-47ebb479cacd

flow of data

To achieve this one component was written:

<template>
  <div :id="this.containerName()" />
</template>

<script>
//utility function to generate a uuid (I didn't wanted to import the uuid
//lib just for a random string
function uuidv4() {
  return ([1e7]+-1e3+-4e3+-8e3+-1e11).replace(/[018]/g, c =>
      (c ^ crypto.getRandomValues(new Uint8Array(1))[0] & 15 >> c / 4).toString(16)
  );
}
export default {
  name: "MicroFrontend",
  props: {
    // name of the microfrontend like `wisdom` or `dicreoll`
    name: {
      type: String,
      required: true
    },
    // host where the script should be loaded from
    host: {
      type: String,
      required: true
    },
    // define a static container name rather than a generic one
    // not needed if you are ok with random divs all the time
    staticContainerName: {
      type: String,
      required: false,
      default: null
    }
  },
  data: function () {
    return {
      uuid: uuidv4()
    }
  },
  methods: {
    // calculates the container id we load the microfrontend app into
    containerName() {
      if(this.staticContainerName != null) {
        return this.staticContainerName;
      }
      return `${ this.name }-${this.uuid}-container`;
    }
  },
  mounted() {//
    // id is generated by frontend - this will avoid loading the same
    // script twice
    const scriptId = `micro-frontend-script-${this.name}`;
    const renderMicroFrontend = () => {
      const fnName = `render${this.name}`;
      const containerName = `#${this.containerName()}`;
      //load the render function per convention and handover the container id
      window[fnName](containerName);
    };
    if (document.getElementById(scriptId)) {
      renderMicroFrontend();
      return;
    }
    //first load the manifest.json this contains the way forward
    fetch(`${this.host}/manifest.json`)
        .then((res) => res.json())
        .then((manifest) => {
          const script = document.createElement("script");
          script.id = scriptId;
          
          script.crossOrigin = "";
          //load out the path to the main.js file
          script.src = `${this.host}/${manifest["src/main.js"]["file"]}`;
          script.onload = () => {
            // call the function defined on top which will resolve then the app
            renderMicroFrontend();
          };
          document.head.appendChild(script);
        });
  }
};
</script>

<style scoped>
</style>

At the mounted stage we will trigger a check and if necessary a load of the corresponding script files.

Each script is ensured to be loaded only once, where the script id is the identifier here. Each microfrontend must follow a convention here and offer in its own application a function called render<name> (e.g. renderDiceRoll ). The manifest json must per convention offer a file with src/main.js which consists of the render functions. The script is than attached to the document header section so that it can be loaded. Afterwards the function is called, which calls the actual render function of the microfrontend app.

Calling one microfrontend is than as simple as including this in the main container.

<vue-micro-frontend name="diceroll" host="http://localhost:8000"/>

The full sample can be found here https://github.com/zelle7/vue3_microfrontend_poc

Not solved here

Things which are left out here:

  • Authentication
  • Communication between services
  • Different technologies (like loading vue3 and vue2 or even things like react)

Links

Playing around with tkinter

A nice tool I’ve found recently using python and tkinter is pygubu-designer. (used for a playing around with python project – https://github.com/zelle7/websocketocppgui)

A typical gui, even the simple ones like those which are build with tkinter come to a point where it become quite cumbersome generating all the variables and/or properties which define the elements in the gui. At least for me, it is getting confusing quite fast and you have a lot of starting and stopping the application, to see if your updates have been successful. The pygubu-designer comes with some a simple gui which allows you to drag in th elements you need. In addition to that you can configure various things (from visual stuff up to click handler functions).

You can install the package via pip(package pygubu https://pypi.org/project/pygubu/ ), and start in the commandline with pygubu-designer.The gui looks like this:

The left part is the configuration part and the right things you see is a preview of the app and how it will look like. The tool itself is generating an ui-file which is just a file with xml content.

One thing which was a little bit confusing at the beginning: There is no way to just drop existing elements into others. e.g. drag an existing label into a frame. As a workaround you can cut the elements and paste them into the wanted containers. Another thing is that you can move elements up, down, left, right with ALT + (I|K|J|L).

Bash Script OAuth Token

Ein einfaches Bash Script das einen Call auf eine Url macht und dort die response ausliest .. z.B. fürs Oauth Token holen


#!/bin/bash
echo "Username:"
read USERNAME
echo "Password:"
read -s PASSWORD

#PASSWORD="abcde"
CLIENT_ID="id"
CLIENT_SECRET="key"
GRANT_TYPE="password"

URL="url"

CONTENT=$(curl -X POST --data "username=$USERNAME&password=$PASSWORD&client_id=$CLIENT_ID&client_secret=$CLIENT_SECRET&grant_type=$GRANT_TYPE" "$URL"  -s)

echo "$CONTENT"

PHP Markdown in Zend2

Oft hat man das Problem das bei von User eingetragenen Daten bzw. Textfeldern zwar Formatierungen erwünscht sind, jedoch auf der Serverseite für viel mehr Aufwand sorgen. Abhilfe schafft hier Markdown, eine eigene Notation für Formatierungen die dann in html umgewandelt wird. Es gibt hier bereits einige fertige Implementierungen für alle möglichen Sprachen, z.B. auch für PHP. (https://github.com/michelf/php-markdown). Hier habe idh die Klassen kopiert und in ein eigenes Modul gepackt. Die Ordnerstruktur sieht wie folgt aus:

Michelf
| Module.php
|__src
__|__Michelf
____|__Markdown.php

Jetzt muss nur noch im application.config.php File das Modul eingebunden werden ..


'modules' => array(
         ...,
        'DoctrineORMModule',
        'Michelf',

    ),

Nun kann der Text leicht in HTML umgewandelt werden


echo \Michelf\Markdown::defaultTransform($text);

AAUShare – Teile Lösungen und Skripten

Ein Studienkollege hat mich auf eine gute Idee für ein neues Wochenendprojekt gebracht. Es handelt sich um eine Online Plattform in welcher Studenten ihre Skripten teilen können. Man sollte sich dort einfach einloggen können und Skripten und Lösungen hochladen können bzw. nach diesen Suchen können.

Ein solches System müsste mit wenig Tabellen auskommen können. Die Datenbank besteht hauptsächlich aus der Tabelle Post – Ein Eintrag mit einen Titel, Text, Files und Tags sowie einen Rating – welcher in mehrere Tabellen aufgespalten worden ist. Es sollen pro Eintrag mehrere Files hochgeladen werden können, sowie ein Rating möglich sein. Um missbrauch zu vermeiden sollte man als User nur einmal pro Beitrag abstimmen können. Um dies zu gewährleisten muss ein Loginbereich geschaffen werden. Dies sollte mit Sozialen Netzwerken schaffbar sein, da heutzutage fast jeder einen Account in einen der Netzwerke besitzt.
Außerdem sollte man den Post auch Tag’s hinzufügen können um leichter gefunden werden zu können, hierbei habe ich an etwas ähnliches wie bei StackOverflow gedacht, da dies dort meiner Meinung nach einfach und schnell funktioniert.
Eine weitere wichtige Funktionalität ist das Kommentieren von Beiträgen, bzw. die Möglichkeit eine Antwort zu erstellen, wobei es wichtig ist zwischen den beiden zu unterscheiden. Eine Antwort kann wieder ein Beitrag mit Files sein, ein Kommentar sollte jedoch lediglich aus Text bestehen und auch in der Anzeige entsprechend gekennzeichnet werden.

Aufgrund der obigen Funktionalitäten habe ich mir folgendes ER-Diagramm überlegt:

ER

Ich habe hier auch mal das Rating aus dem Post herausgezogen, aus der Überlegung heraus, das für das RatingUpdate nicht auf die Post Tabelle zugegriffen werden muss, ich bin mir aber noch nicht sicher ob das sinnvoll ist.

Als Technologien habe ich ZF2, Doctrine2, Bootstrap (+Font Awesome), JQuery (+Plugins) gewählt, da ich mit diesen das meiset abdecken sollte.

Die Grundstruktur ist gleich wie bei meinen letzten Posts zu Zend / Doctrine. Ein Stolperstein bei den Entities waren die Mappings von Post zu File und Post zu PostTag. Es musste z.B. beim Mapping Post – PostTag auf der PostTag Seite folgendes hinzugefügt werden.


/**
* @ORM\ManyToOne(targetEntity="Post", inversedBy="post")
* @ORM\JoinColumn(name="postid", referencedColumnName="id")
*/
protected $post;

Ein einfaches Mapping auf die postid hat nicht funktioniert, warum genau habe ich nicht herausfinden können.

User Auth

Da die OAuth Lösungen auf die schnell nicht funktionierten habe ich mich Entschieden das Auth Beispiel von https://github.com/samsonasik/SanAuth/ zu modifizieren und an meine Bedürfnisse anzupassen. In dieser Auth wird noch nicht auf Doctrine Entities zurückgegriffen, daher habe ich mithilfe von https://github.com/doctrine/DoctrineModule/blob/master/docs/authentication.md dieses angepasst. Die Anpassungen werde ich in einen anderen Beitrag nochmal genauer erklären.

Nächsten Schritte

Aktuell funktioniert das hochladen von Dateien und das Erstellen von Posts, sowie das einloggen dran. Als nächstes kommen die Kommentare und die Antwortfunktion dran. Außerdem müssen sich noch User registrieren können, dies werde ich über ein Aktivierungsmail lösen. Der nächste Blogeintrag kommt also bald.

Scroll to top